|
Day 1 - 2[]
It seems you have successfully installed the Technic pack huh? Let's get started with it!
(reminder-- Some parts of the tutorial will be concentrated on a few of the more major mods)
Step 1: Getting Started[]
You spawn, and you look around. If you are lucky you may be able to spot some world generation tweaks already. And by that I mean RP volcanoes, RP/IC2 rubber trees and such. Ignore those for a bit and start the usual way-- Punch some trees, make planks, a workbench, and a tree tap.
Step 2: Food[]
When beginning with the Technic Pack the easiest way to find food is to kill pigs, cows and chickens. Also Mo' Creatures enables you to kill fish in the sea with your hands, so fish can be killed and their eggs made into omlets. Just hop into the water and start punching. If you are near a vanilla NPC village you have the option of looting their crops also. Whilst you are killing animals it is recommended you attempt to gain some wool from sheep also, to make a bed only if you can find iron early on for the shears.
Step 3: Shelter[]
After you have stone tools, a furnace, a few torches, and some food go look around your spawn point. Please, pick something below and make a shelter out of it.
RP2 rubber trees -- These are huge, don't burn, and when you are at the top of the tree, hostile mobs on the ground don't see you. The trunk is a 3x3 square, so you can make a ladder up to the top of the tree.

A red power rubber tree found in a forest
Caves-- O ye, caveman. Simply seal the door and put a few torches up and you have a good cave to live in. Also, if the cave continues, make sure to wall it off to make sure mobs that spawn in the cave can't wander into your new house.

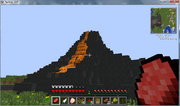
A Volcano
Your own house-- A worst-case-scenario option because this is time consuming and takes lots of materials. However, if you have some wood it's a viable option nonetheless.
Step 4: Resin and Rubber[]
Once you have a home, make a treetap like so:

2 resin spots on a rubber tree
Find a rubber tree , there should be a orange spot on it, right click on that spot with your treetap. It should spew out 1-3 Sticky resin . You can smelt this in a furnace to get rubber , or you can put it in an extractor later and get 3 rubber per resin. You need rubber to make your first machines anyway, so please don't mind smelting some resin into rubber (although inefficient). Don't cut down the tree, as the resin will respawn. You should, however, cut some leaves to get saplings to plant at your base.
Step 5: Mining[]
Once you have your house, it is advisable to start mining. If you can, find a cave. If you can't, just start your mine in your house, if you can light it.
You might find the following (New) ores:
- Tin (from RP2, IC2, a fundamental of IC2 along with Copper and Iron)
- Copper (from RP2, IC2, a fundamental of IC2 along with Tin and Iron)
- Ruby , Sapphire and Emerald (from RP2)
- Tungsten (From RP2, keep it because this ore is worth 2 diamonds in terms of EMC, currently useless otherwise. You can't even smelt it!)
- Silver ore (from RP2, has some uses)
- Nikolite (From RP2, has some uses)
- Uranium (from IC2, used to make nukes ! and nuclear reactors)
Also make sure you have some:
- Iron Ore (Grab as much as you can, you need a large amount of it to master IC2(or just grab 6-7 stacks))
- Redstone (very useful in IC2 and for pretty much anything else)
- Diamond (you need this to start EE2, and make sure you grab at least 6 if you can)
- Coal (charcoal too!)
- Gold (it is so useful now in IC2 and EE2)
- Lapis Lazuli (or whatsoever, useful in IC2, you actually need quite a bit of it for more advanced machines)
- Obsidian (to go to the nether, make transmutation tablets, enchantment tables, etc. Just make a nether portal and mine 4 more. It also has a very high rate for Vis in Thuamcraft 2.)
Day 2 - 4[]
Step 1: Crafting[]
( Only smelt what you need, because a macerator can double most of what you mined! ) Store redstone and diamond for later but smelt the copper, tin, and iron. With the rubber and copper, you can craft copper cables like so:
With this, press U with your mouse over the cable and you can see some of the recipies you can make with this (there should be a lot). Now with Tin, Redstone, and Copper wire, make a battery, this has many uses too.
Now make an Iron Furnace:
OR
This can smelt things 10% faster and a 10% fuel efficiency bonus. Coal now smelts 10 things VS. 8 prevously. Now Smelt some already smelted iron to get refined iron. Try to smelt as few ores as possbile.
And finally make a generator:
Note: The machine block recipe is:
OR
Now craft a Electronic Circuit:
And finally, a Macerator:
When you put this next to a generator ( You can also put it above and beneath ) , it will macerate 1 ore into 2 ore dusts. Then it can be smelted into ingots. Doubling the value. Be sure to give the Generator fuel (coal, charcoal, anything you use in your furnaces)!
When you can, craft some low covalence dust with cobblestone and charcoal. Use it to make a divining rod. It won't be very helpful right now, but later you can upgrade it to make it more useful.
Now pick a Technic Pack mod and read some pages in this wiki to learn more about it, it's your world :D!
Still need help? Read on!
Step 2: More Machines[]
Smelting resin to get rubber is very inefficient, especially later on when you use it more. To solve that problem you must craft an extractor.
For an extractor you'll need:
4 treetaps
1 machine block
1 electronic circuit
Once you have these just craft the extractor:
The extractor will give you 3 rubber from one resin, rather than just one. Place it next to your generator and it should work.
You will need to smelt lots of things, but the iron furnace just isn't good enough. Your next machine will be a big ol' butthole
For an electric furnace you must get an electronic circuit, a machine block, 2 redstone, and your old iron furnace. Now just craft 'em up with this recipe:
Step 3: More Power[]
With all these new machines you need lots of power, but a generator doesn't cut it. To get more power you need better/more types of generators. Example: geothermal generators and solar panels.
Solar panels are quite hard to make, so we will start with a geothermal generator.
You will need the following to create a geothermal generator:
4 tin (more needed to fuel generator)
4 glass
2 refined iron
1 generator (You don't need to make a new one)
With the tin you must craft some empty cells.
Then you can make it.
Now just place it where your generator used to be.
In order to fuel the geothermal generator you must get some lava cells. First craft about a stack of empty cells then venture back down into your cave. Once your in the cave you must find a pool of lava. When you get to the lava, hold your empty cells and right click until you run out of cells or lava. Place your lava cells into the bottom slot of the geothermal generator and it will begin to fuel it.
Day 4-6[]
Step 1: Energy Condenser[]
If you managed to collect at least 6 diamond proceed with this step, if you didn't skip it and come back once you have 6 diamond.
One of the most useful tools in the technic pack is the energy condenser, so that is what you will be making now. It is quite expensive, diamondwise. First you must make the following three recipes: ( For the light green dust you need charcoal, not coal. )
Next get a chest, 2 iron ingots, and 2 stone. Then craft them into an alchemical chest.
For the final recipe you will need obsidian, but you don't have to go back into your cave. First take 8 lava cells from you generator then fill 8 spare empty cells with water. If you don't have spares just make more. Then craft them together like this to get 4 obsidian:
Now you can make the final recipe:
Place it down somewhere then open it. Placing an item in the top left with set the condenser to create that item. Then put things into the bottem slots to create that item. I reccomend putting a diamond in the top left.
Step 2: Solar Power[]
Now that, hopefully, you are later on in the game, you should craft some Solar Panels , as lava is rarer than daytime.
Know that you will need to use your macerator for the coal dust. Solar panels are crafted like so:
These only produce 1 EU/t, but are worth it. You can eventually create the overly-expensive-yet-worth-it-more Solar Arrays (actually, the overly expensive one is HV solar array.) They are crafted like so.
LV Solar Arrays output 8 EU/t - the sum of the Solar Panels used to create it, also 1/4 of maximum LV (32 EU/t).
These output 64 EU/t - the sum of the Solar Panels used to create it, also 1/2 of maximum MV (128 EU/t).
These output 512 EU/t - also the sum of the Solar Panels used to create it, and exactly amount of maximum HV.
Now just place these in an area under direct sunlight, connect your wires to a batbox, crafted like this:
Then connect the part of the batbox with a circle to your machines. (When you place it the circle faces you.)
Or if you don't have resources for a batbox, plug it directly into your machines.
With the batbox you can charge different electric tools like drills, chainsaws and electric wrenches, hoes, and treetaps by putting them in the top slot.
Day 6-8[]
Step 1: Advanced Machines[]
You've been going fine for a while, but your furnace is too slow, there's not enough room in your macerator, your extractor has both of these traits.
Well, then, I guess it's time to upgrade these machines.
First, you need to craft yourself a basic compressor.
Compresses items down into more usable items (such as Uranium into Refined Uranium which can be used to make Nukes!)
Next, you will need to know these recipes to make the advanced machines:
Carbon Fiber
Carbon Mesh
Finally, Carbon Plate
Bronze Dust
Bronze Bar
Mixed Metal Ingot
Finally, Advanced Alloy
Final recipe, the advanced machine block.
Now to make the advanced machines:
( You don`t have to make these all now. )
( NEVER BREAK YOUR MACHINES WITH A PICKAXE! You must right click them with a wrench to collect it.)
Induction Furnace:
Rotary Macerator:
Singularity Compressor:
You may have noticed that I left out an upgrade for the extractor, that is because it requires electrolyzed water cells which are far out of your reach right now.
Once you place your new machines back next to your generator you must put a redstone torch next to each one. Don't use the machines until they build up 100% heat, 7500 RPM, and/or 75000 PSI. Every second each machine uses up 10 EU, which isn't alot but over time it will use up all your lava. That is why the solar panels are really important, because they provide these machines with enough power so no lava is wasted.
Continuing[]
Feel like Balkon's Weapons Mod just isn't enough? Want to upgrade from iron tools and armor? Well, do we have just the thing for you!
Nano Armour is the 2nd best armour available through IC2, and the cheapest endgame armour available. This armour, in collaboration with an over-powered weapon, will render you nearly undefeatable to the average skeleton!
Firstly, we must build an MFE, so as to charge the equipment we will be building. The recipe is as follows:
Please note that the output from this machine is MV, so if you connect it directly to your Macerator, expect an explosion shortly after. To prevent this, you will have to make a LV Transformer, and wire the energy through that.
Now that we have our MFE, we can move onto the actual equipment. Let's start with the Nano Saber:
This is a very powerful weapon that should make your life much easier. However, it loses charge quickly, so consider carrying a backup weapon when adventuring.
Next we will make the armour. Now, this is very expensive, and only works if the entire suit is charged. But, it will deflect most damage.
The Helmet:
The Chestplate:
The Greaves:
The Boots:
Now, place all of the armour into the MFE to charge it. Once the green bar on the bottom of the icon is full, then you may equip your armour! If you somehow sustain enough damage to consume all of the charge in your armour, then simply charge it again. Thanks for reading, and have fun slicing spiders!
A much long neglected EE2[]
So now that you have progressed into IC2 you should do all of EE2 next, start with the transmutation table.

then build a alchemical chest but don't put it down.

Then craft it into a energy condenser
Warning: Back up your worlds before you try setting up a machine that uses the Energy Condenser in conjunction with Buildcraft Transport Pipes. Doing so will significantly increase Minecraft memory usage, and in the worst case, it might corrupt your world and make it unplayable.
NOTE: Also, removing the target of the Energy Condenser while having a powered Transport Pipe attached to it may also corrupt your world.

then make an energy collector:
Put it next to your energy condenser.
im sorry this tutorial is so brief but I did not have time someone plz finish it. (I will probably come back.)
Afterwards[]
After you have done all this you should have a basic understanding of what to do next. You could become a awesome wizard with Thaumcraft or a master engineer by combining Redpower 2 and Buildcraft! There is many things to do from here but it is all your choice! ;)


