|
|

The finished farm
As of Technic 7.2, the Forestry mod along with several others are no longer included in Technic Pack. There are still ways to automate tree farming, but many of them require using Equivalent Exchange to convert something else into logs or using Thaumcraft to duplicate logs or using a farm that requires bonemeal. However, this design functions without bonemeal and uses only simple Redpower machines to function, giving it the advantage of being easy to set up and easy to expand, as well as being fully autonomous and not requiring to be restocked with saplings due to it's ability to collect saplings from decaying leaves.
Materials Needed[]
- 1 Dirt
- 27 Solid Blocks (any)
- 2 Torches
- 1 Sticky Piston
- 1 Deployer
- 5 Block Breakers
- 4 Transposer
- 1 Sequencer
- 1 OR Gate
- 7 Red Alloy Wire
- 5 Jacketed Wire (any)
- 7 Pneumatic Tubes
- 14 Redstone Tubes
- A small amount of saplings
Step One: Laying The Foundation[]


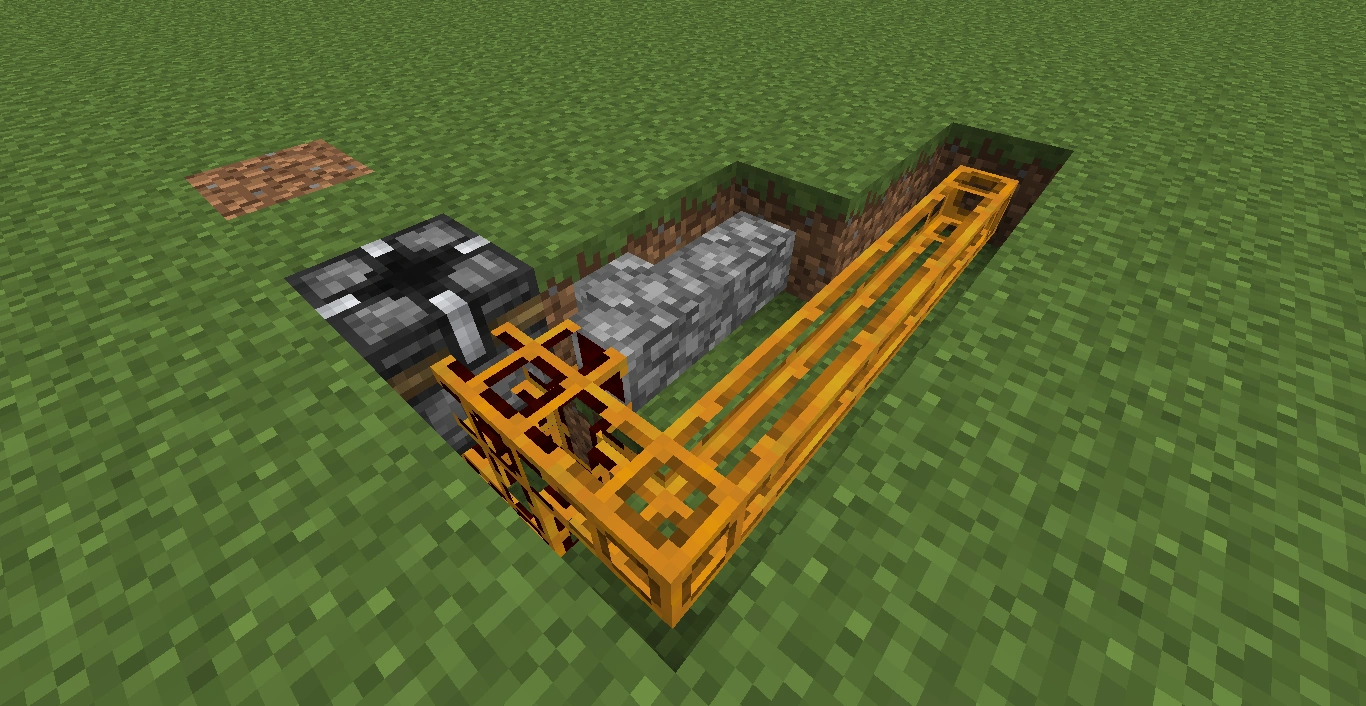
The foundation hole
First, find a flat clear 6x7 space to begin construction. Dig out a 5x3 L shape one block deep in the ground. Now dig out two blocks in the inside corner of the L, oriented along the long end of the L. Then dig the two blocks on the end of the short leg of the L down one more block. After doing this the hole should look the same as the picture shown.
Step Two: Filling The Foundation Machinery[]

The foundation machinery
In the two blocks in the deep portion of the hole, place two redstone tubes. On top of those two tubes, place another redstone tube and a block breaker oriented upwards, with the redstone tube placed closer to the center of the hole. Next place five pneumatic tubes in a line along the straight long edge of the hole. In the remaining two empty air blocks in the foundation hole, place two pieces of jacketed wire. On the side of the block that is located adjacent to the jacketed wire and the block breaker, place a piece of red alloy wire so it connects to the jacketed wire. The result should look like the picture shown.
Step Three: Adding The Base of the Trunk Breaking Arm[]


The base and it's wiring
On the piece of pneumatic tubing that connects the 5 piece long tube to the redstone tubing, place two more pieces of pneumatic tubing on top of it straight up. Place a sticky piston pressed against this tubing on tob of the redstone tube, oriented with the piston head towards the block breaker. Now place five of a solid block on top of the 5 piece long pneumatic tubing against the newly placed tubing as shown in the photo. Add red alloy wire and jacketed wire to these blocks as shown.
Step Four: Adding The Sapling Machinery and Wiring[]


The tree farm with the sapling machinery and wiring placed
The block located in the ground adjacent to the block breaker and across from the sticky piston is where the sapling will be placed. Next to this block, across from the block breaker, place a deployer oriented towards the piston and block breaker. This deployer will be responsible for deploying saplings whenever the farm chops down the tree. On the two remaining spaces adjacent to where the sapling will be placed, place a Sequencer and an OR Gate. The or gate will be placed on the side of the sapling where the base and it's wiring are located, and will be oriented so it's output points towards this wiring. Place down a piece of red alloy wire to connect the or gate to the jacketed wire. Now place a piece of red alloy wire on the space adjacent to the sequencer on the other side of the sapling connecting it to the deployer. Place a piece of jacketed wire on top of this wire in the same space. On the two empty spaces diagonally adjacent to where the sapling will be placed, put two torches down. The final result should look like the photo shown.
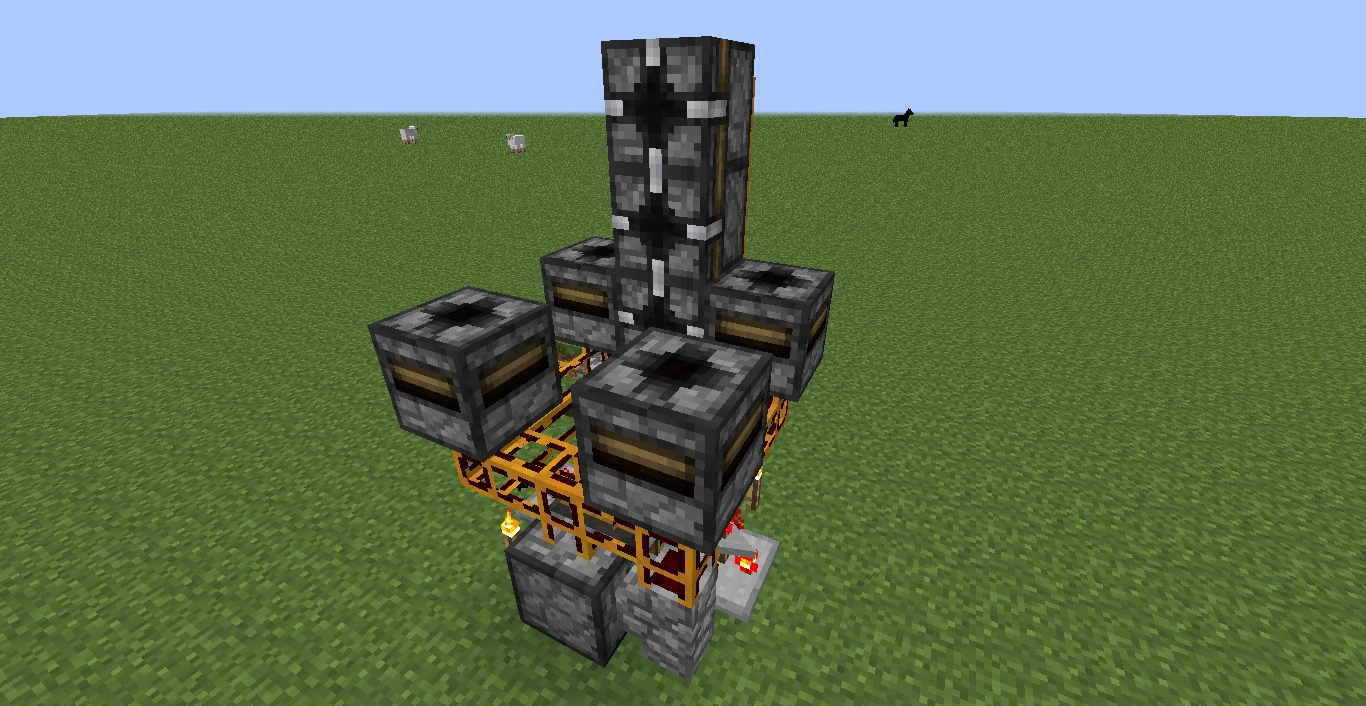
Step Five: Adding The Trunk Breaking Arm[]


The finished trunk harvesting arm
On top of the sticky piston, place four pieces of redstone tubing in a tower going straight up. Place four block breakers against these tubes facing the same direction as the sticky piston. You may need a screwdriver to orient these blocks properly. The result is the portion of the tree farm responsible for harvesting the trunk of the tree, while the base of the arm harvests the stump.
Step Six: Placing The Transposers and Their Tubing[]

The transposers for sapling collection
Place seven pieces of redstone tubing in a 3x3 U shape, with the center of the 3x3 shape over the sapling space and the vertex of the U on top of the deployer. Then place four transposers on top of the four corners of this tubing, with the transposers input faces oriented upwards. The result should look as shown.
Step Seven: Adding The Solid Platform and Cap Block[]
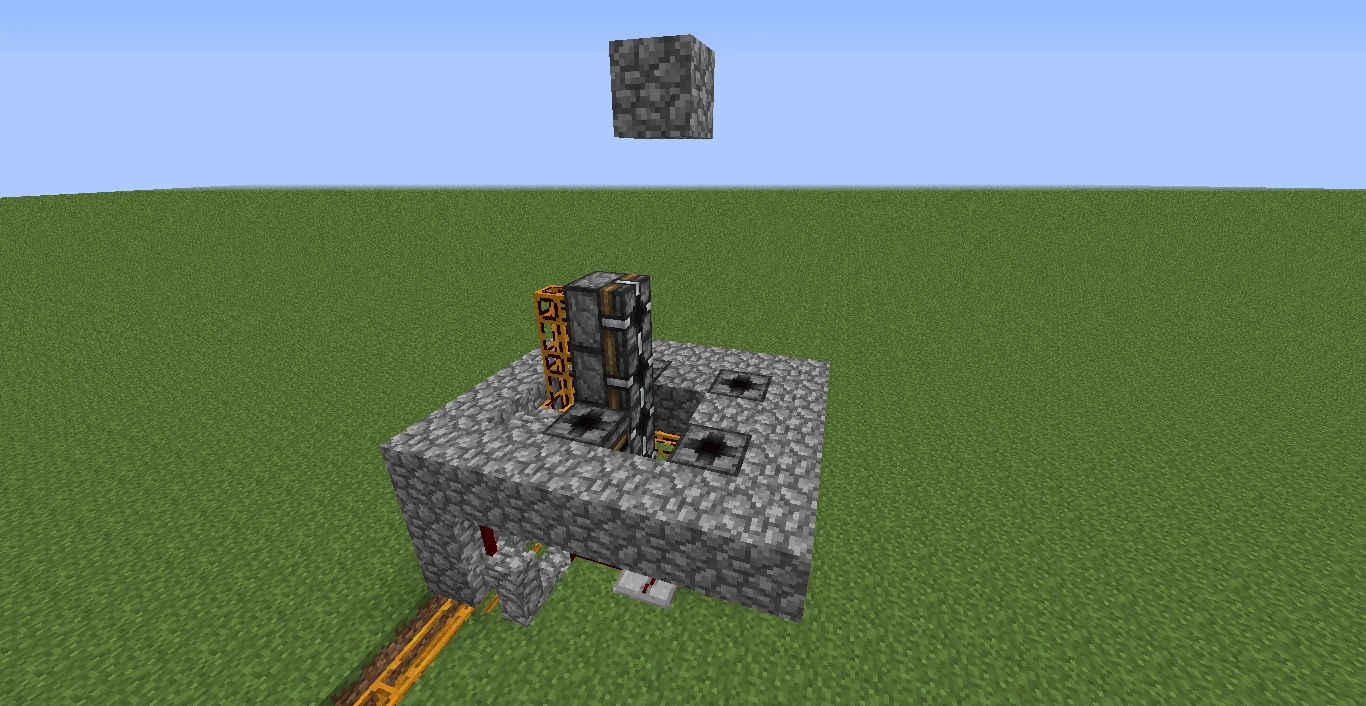

The finished platform for sapling collection
Place solid blocks around the transposers and the rear of the machine as shown, leaving open a hole for the tree to grow. Then place a single solid block exactly three blocks above the height of block breakers, directly over the space where the sapling would be placed. There should be two blocks of air between this block and the top of the block breakers. Refer to the picture in case of confusion.
Final Step: Connecting the Farm Output[]
The only remaining step is to connect the output of the farm, which is the pneumatic tube coming off the side of the farm, to a chest and to place some saplings in the deployer to get it started. This is a very slow farm as it doesn't rely on bonemeal, so in order to make it efficient you may have to create several of these farms and connect them all to a central chest. Enjoy your free logs!
(This design was created and added by the contributor Universalist, but it was inspired by the design that previously occupied this page which is accredited to the user Marco polo333)